Bagel Seasoning (My Favorite)

I love bagel seasoning. My latest breakfast routine has been 1/2 a toasted plain bagel slathered with cream cheese topped with lots of bagel seasoning, then topped with fresh baby spinach, or this summer slaw.

I think Trader Joe’s bagel seasoning is okay, but it has so many poppyseeds that when I get close to finishing it, that’s all there is – poppyseeds everywhere! It’s also super salty. So, I decided to throw together my own. As you can see, I really went for it with the dried garlic and onion, because to me – that’s where all the flavor is at. I highly recommend using Maldon Sea Salt Flakes (it’s available on Amazon.com, or in person at The Fresh Market, Williams-Sonoma, and Lowe’s Foods).

Bagel Seasoning

2 Tablespoons dried minced garlic

2 Tablespoons dried minced onion

1 1/2 Tablespoons white sesame seeds

3/4 Tablespoon black sesame seeds

1 teaspoon poppy seeds

3/4 teaspoon Maldon Sea Salt Flakes

Stir all the ingredients together and store in a covered container (such as a small deli container, or jar) for a year. Sprinkle on whatever your heart desires!

Brown Butter M&M Blondies

Everyone needs an easy delicious bar cookie in their back pocket (so to speak). My favorite part is the crunch from the M&Ms, so I added more of those. I remember being so excited in 1995 when the tan M&M was discontinued, and blue was voted to take its place. Do you remember that?

These bar cookies are the buttery, soft, sugary goodness you need to make it through the week. They are so good (and so easy to make), you’ll be making them on repeat.

I’m trying out a new recipe format, where the ingredients and instructions are broken down into sections. Let me know what you think. Have a great week friends!

Brown Butter M&M Blondies Adapted from Halfbaked Harvest

Preheat the oven to 350 degrees.  Spray a 13 x 9 inch pan with nonstick baking spray; set aside.

2 sticks of unsalted butter

In a medium pot, cook the butter for 8 minutes on medium heat until browned.  Swirl the pot occasionally.

1 teaspoon coarse kosher salt

½ cup dark brown sugar, packed

½ cup sugar

1 teaspoon vanilla

Take the butter off the heat, and add in the salt, and the sugars.  Whisk until combined.  The mixture won’t completely combine, and that’s okay.  Let it sit on the counter for 10 minutes to cool slightly.

2 large eggs

Whisk the mixture again, then whisk in the eggs one at a time, until completely incorporated.

¾ teaspoon baking soda

2 ¼ cups flour

Whisk in the baking soda.  Then add in the flour, and use a rubber scraper to stir it in.  I like the add the chocolates when the flour is halfway mixed in.

½ cup semisweet chocolate chips

2/3 cup M&M’s

Once flour is halfway mixed in, add the chocolate chips and M&M’s.  Stir until combined, and there are no streaks of flour.

Scoop into your prepared pan. The dough is thick.

12 Hershey kisses, unwrapped

Then press in the Hershey kisses sideways all around the dough.  Trying to make sure each slice gets a kiss.  Also, feel free to add any extra M&M’s on the top of the dough.

Bake for 19-20 minutes.  Let cool in the pan.  There will be some residual baking, so don’t go over 20 minutes.  20 is perfect for my oven. 

Let cool for about 15 – 20 minutes before cutting into the bars.  Store covered at room temperature for up to 4 days.

Estyleen’s Hershey Syrup Brownies

Growing up in the 80s, there are certain recipes that stand out in my memory. Coca-Cola cake, seven layer dip, strawberry Jello pretzel salad, and Hershey syrup brownies.

In fact, Hershey syrup brownies were one of the few recipes that my maternal grandmother liked to make, so I always associate them with her. They’re cakey, fudgy, moist, and dense; and they’re topped with a fudge-like frosting. Maybe it would be best to described them as a fudgier version of Texas sheet cake.

It’s taken me awhile to post this recipe, because like a lot of old (hand-me-down) recipes, there wasn’t much in the way of instructions. And I kept running into the issue of grainy frosting. I’ve seen others post a similar recipe, and their frosting is also grainy. Perhaps that’s part of the allure of this particular brownie recipe, but my family isn’t crazy about the grainy frosting. If you follow the directions listed below, your brownies shouldn’t have a grainy frosting either.

I’ve discovered that it’s best to bake the brownie first, and then work on the frosting, because it sets up immediately, with hardly any time to spread it. So be sure to work fast.

You may also notice that there isn’t any leavening agent (baking soda or baking powder) in this recipe, and that was by design.

I hope you love these as much as we do!

P.S. Below is a homemade Hershey syrup recipe in case you don’t keep it in stock regularly at your house. This syrup recipe makes a little over 2 cups of syrup, I use the extra to mix up a small glass of chocolate milk.

Hershey Syrup Brownies Adapted from Estyleen’s recipe

1 stick of unsalted butter, softened

1 cup of sugar

1/2 teaspoon coarse kosher salt

3 eggs

2 cups (16 ounces) Hershey syrup

1/2 teaspoon vanilla

1 cup flour

Preheat the oven to 350 degrees. Spray a 13×9 inch pan with nonstick spray. Set aside.

In a large mixing bowl, beat the softened butter, sugar, and salt until creamy. Add in the eggs and beat until combined, and there are few (if any) little clumps of butter. Add in the syrup and vanilla – beat until combined; then add in the flour. Beating just until the flour is completely mixed in. Overmixing will result in tough brownies.

Pour the batter into the prepared pan and bake for 30-32 minutes. Insert a toothpick into the center of the brownies – it should come out clean (or with only a crumb or two) when it’s done.

Take the pan out of the oven and set it aside to cool. Make the frosting.

Fudge Frosting Adapted from Estyleen’s recipe

1/4 cup unsalted butter

1/4 cup milk

1 Tablespoon corn syrup

1 cup sugar

pinch of salt

1 teaspoon vanilla

4 ounces semisweet chocolate (I used Baker’s), broken into 4 pieces

In a medium sized pot, melt the butter, then add in the milk, corn syrup, sugar, and salt. Stir until combined. Wash the any sugar crystals off the sides of the pot with a wet pastry brush. Cook the mixture on medium-low heat. Once the mixture has started to simmer on the edges of the pot, start a timer for 4 minutes. Do not stir during this time.

Once the timer goes off, take the sugar mixture off the heat and add in the chocolate and vanilla, whisk constantly until completely melted and shiny. Immediately pour the frosting onto the hot brownies and spread quickly with a nylon scraper. It will set up immediately.

Let cool completely. Serve once cooled. Cover with plastic wrap and store on the counter for up to 5 days. These do not stack well.

Homemade Hershey Syrup adapted from Allrecipes

1 1/2 cups water

1 1/2 cups sugar

1 cup Hershey’s original cocoa powder

pinch of salt

1/2 teaspoon vanilla

In a 4 quart saucepan, add the water, sugar, cocoa, and salt. Whisk until combined. Cook on medium heat, whisking occasionally, until the mixture begins simmering. Then stop whisking, start a timer for 2 minutes, and let the mixture come of a full boil – it will climb the pot as it’s boiling. Once the timer goes off, take the pot off the heat and whisk in the vanilla. Set aside to cool. Then pour the syrup into a container and refrigerate it (covered) for up to 2 weeks. If you’re using the syrup for the brownies, let it cool to room temperature before using (so it doesn’t melt the butter), or use it cold from the refrigerator.

Red Velvet Cake

This is the first red velvet recipe I ever tried, and it’s a family favorite! It’s soft, moist, and lightly chocolatey. I like to pair it with Italian Meringue Buttercream Frosting, or (like the photo) Chocolate Italian Meringue Buttercream Frosting. Either way, it’s absolutely delicious, and I don’t think you’ll miss the cream cheese frosting. I was able to use a single batch of frosting to fill and cover the cake.

This recipe makes 2 – 9 inch cake layers, or a 13×9 inch pan. You’ll want to purchase Dutch process cocoa powder for this cake – I like Cacao Barry Cocoa Powder (I buy it through Amazon). They sell it in a 2.2 pound bag, which lasts for a long time, and I use it in lots of chocolate dessert recipes (cakes, brownies, cookies, etc.). In fact, just enter “cacao barry” into my search bar and loads of recipes will come up!

I also share one of my favorite ways to keep a cake moist without using sugar syrup.

Red Velvet Cake Adapted from Layered

3/4 cup canola oil

1 1/2 cup sugar

1/2 teaspoon coarse kosher salt

2 eggs

1 teaspoon vanilla

3/4 teaspoon baking powder

3 Tablespoons Dutch processed cocoa powder (I use Cacao Barry Brute)

2 Tablespoons red liquid food coloring (I use McCormick’s 1 ounce bottle – the entire thing)

1 3/4 cup flour

1 cup buttermilk

1 teaspoon baking soda

1 teaspoon distilled white vinegar

Preheat the oven to 350 degrees. Spray pans (2 – 9 inch round baking pans or a single 13×9 inch pan) with nonstick baking spray. Line pans with parchment (cut to size) and spray again. Set aside.

Next, on a clean counter, set out two lightweight cutting boards (set apart enough that their plastic wrap won’t interfere with the other) and line the boards with 2 pieces of plastic wrap (about 3 feet long by 2 1/2 feet wide), placed in a cross shape (1 down the board, and 1 across). Essentially, you’ll need enough plastic wrap to wrap around each cake layer. The cutting board simply allows you the ability to transport the cake layers, while keeping them level (both in, and out, of the refrigerator).

In the bowl of a stand mixer (using the paddle attachment), add the canola oil, sugar, and salt. Beat on medium speed for about 1 minute – until combined. Add in the eggs, beating them in one at a time, until completely combined. Add in the vanilla, baking powder, cocoa powder, and red food coloring. Beat until incorporated.

Stop the machine, and scrap the bowl down. With the mixer on low, add the flour in three separate additions, alternating with the buttermilk. Make sure to begin, and end, with the flour. Once the batter is almost completely mixed, stop the mixer.

In a mini bowl, whisk together the baking soda and vinegar – it will bubble up immediately, so make sure you have a little room for the expansion. I like to use 3 inch mini bowls for this. Add this mixture immediately to the batter in the stand mixer, and mix on low to medium speed for about 30 seconds to make sure everything is incorporated. Mixing too long with result in a tough cake, so don’t over mix it.

Pour the batter into your pan/s, and bake in the oven for about 20-25 minutes. Check doneness with a toothpick inserted into the center of the cake.

Let cakes cool in pan/s for about 5 minutes. Then carefully loosen sides of the cake with a nylon scraper and turn them out onto the prepared cutting boards lined with plastic wrap – careful, cakes are very hot! Immediately, loosely cover the cake layers with the plastic wrap and place them in refrigerator. Make sure that the cakes aren’t stacked on each other and are sitting level. Let them cool in the refrigerator for at least 4 hours before frosting. The condensation from the hot cakes wrapped in plastic wrap set inside the cold refrigerator will develop added moisture in your cake layers. When you’re ready to decorate, remove the plastic wrap from one layer at a time, and remove the parchment liner. Frost as you would normally.

The cake doesn’t require refrigeration, but I think it retains moisture better if it’s kept covered in the refrigerator; enjoy for up to 5 days.

Caramel Milk Creamer

IMG_0656 (3)

I’m not much of a coffee drinker.  Sigh.  It smells so good, but it just doesn’t taste good (to me).  This creamer is a game changer.  I love to add this to coffee with a pinch of cinnamon for a Fall-ish drink, and my kids like to drink it straight – like chocolate milk.  However you decide to enjoy it, it’s delicious!

Caramel Milk Creamer Adapted from The Prairie Homestead Cookbook

1 cup light brown sugar, packed

1/2 cup water

1/4 teaspoon coarse kosher salt

1 cup heavy cream

3/4 cup whole milk

1 teaspoon vanilla

In a medium pot, add the brown sugar, water, and salt.  Stir until the sugar is saturated.  Then turn the stove on to medium high heat (5/6), and when the edges of the mixture start to boil, set a timer for 5 minutes and don’t stir.

In the meantime, measure the heavy cream, milk, and vanilla.  Set aside.

Once the timer goes off, remove the caramel from the heat, and whisk in the milk, cream, and vanilla until combined.  You can use it immediately, or refrigerate!

Store in the refrigerator for 2 weeks in a covered container.


Dr. Pepper Sheet Cake

IMG_0639 (3)

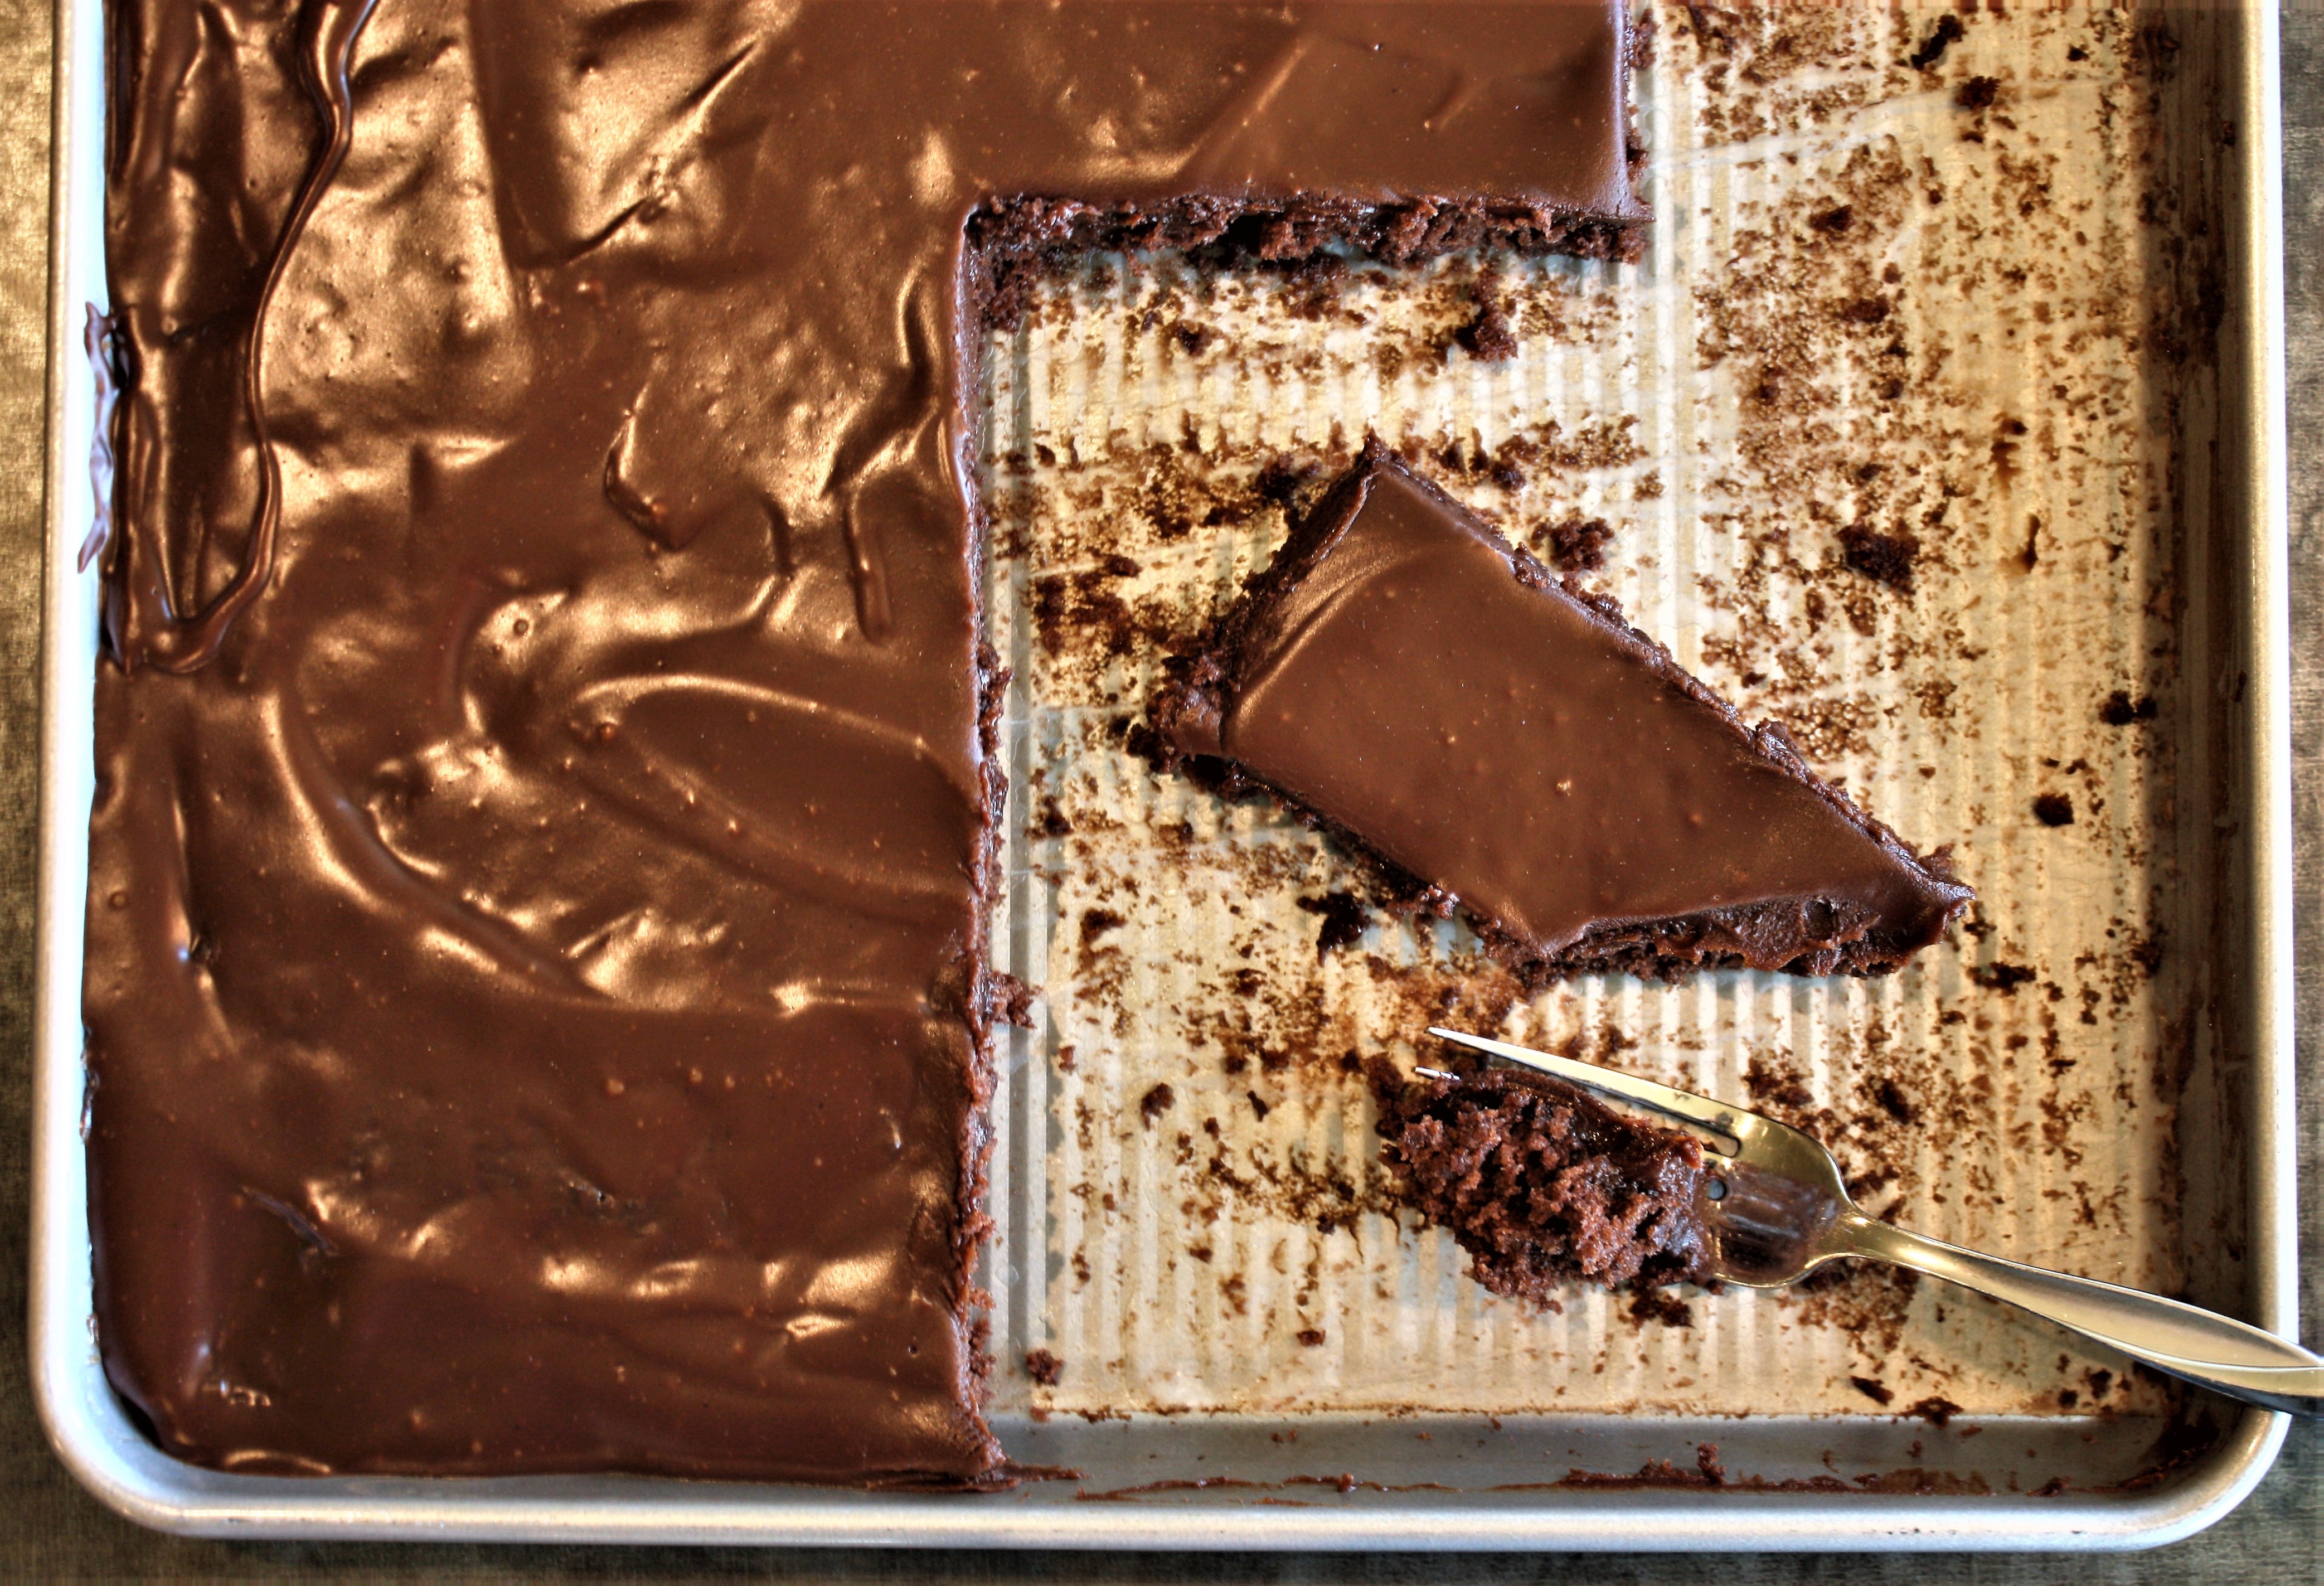
Life is messy, so sometimes you just have to remember that you’re not in control (of so very many things) and that every now and then, you should just eat some rich gooey cake while binge watching tv.  Life will keep going, and you can jump back in when you’re ready – or when someone kicks you off the tv, or the repairman shows up.

Luckily, this cake comes together quickly (I heart sheet cakes) and it’s topped with the best fudge frosting ever.  No refrigeration required, which suites me just fine since my refrigerator fan just died, I think.  I’m waiting for the final word on that from the repairman.  I just hope it can be fixed – I hear there’s a long wait for freezers, so I have no idea if refrigerators are hard to come by.  Anyway, it’s a minor inconvenience – definitely a first world issue.  I’m certainly not complaining, no sir, I’m just sitting back eating cake and dreaming about a cold glass of milk.  Sigh.  It’s the little things.

Back to the cake.  When I was growing up, my mother’s very eccentric, very southern, family would serve this cake at family gatherings.  I thought the chocolate sheet cake was incredible, not only because it was decadent, but because it tasted faintly of cherries without having single cherry in it.  It’s the Dr. Pepper you all!  Mind blown!

The mini marshmallows add a nice chewy sweetness to the cake.  You could make it without them, but why would you want to?!

I like to use this pan, but you could use a different size pan if you want, just make sure to give the cake more time to bake if you are using a smaller/deeper pan.

I hope you all love this cake as much as we do!

Dr. Pepper Sheet Cake Adapted from American Cake

2 cups flour

1 3/4 cups sugar

1/2 cup salted butter

1/2 cup canola oil

3 heaping Tablespoons unsweetened cocoa powder (I like to use Dutch processed)

1 cup Dr. Pepper

1/2 cup buttermilk

2 eggs

1 teaspoon vanilla

3/4 teaspoon baking soda

1 1/2 cups mini marshmallows

Preheat the oven to 350 degrees.  Spray a 18″ x 13″ x 3/4″ pan with nonstick spray and line with parchment, spraying the pan again.  Set aside.

In a large mixing bowl, whisk together the flour and sugar.  Set aside.

In a medium pot, add the butter, oil, cocoa powder, and Dr. Pepper.  Whisk on medium/low heat until combined, then continue to whisk the mixture occasionally.  Once it comes to a full boil, remove the mixture from the heat and pour it directly into the flour/sugar mixture.  Whisk the mixture until completely combined.

Next, whisk in the buttermilk, eggs, vanilla, and baking soda into the batter until combined.  Then stir in the mini marshmallows.  Pour into the prepared pan.  Place in the oven for 14-15 minutes, or until a toothpick inserted in the center comes out clean.

Let the cake cool in the pan for about an hour, then make the frosting.

Chocolate Fudge Frosting Adapted from Baking Unplugged

12 Tablespoons, cold unsalted butter (divided)

1 cup light brown sugar, packed

¼ cup light corn syrup

¼ teaspoon coarse kosher salt

1 cup heavy cream

8 ounces semisweet chocolate (I use Bakers),  each bar broken in half

2 teaspoons vanilla extract

In a medium pot, add 6 Tablespoons cold unsalted butter, brown sugar, corn syrup, salt, and heavy cream and whisk to combine. Whisk intermittently on medium heat (6) while the butter is melting.  Once the butter has melted completely, stop whisking and let the mixture boil (you’re basically making a caramel).  Let the mixture continue to boil until the very center is a full boil – it should only take a few minutes.  Then, set a timer for 6 minutes, and don’t whisk or stir.

When the timer goes off, remove the hot pot with the caramel from the heat, and add in the chocolate and vanilla. Let sit for 5 minutes, without whisking – this time will allow the chocolate to melt.  When the timer goes off, whisk in the (now) melted chocolate, vanilla, and caramel sauce until smooth. Next, whisk in the additional 6 Tablespoons cold unsalted butter until completely combined.

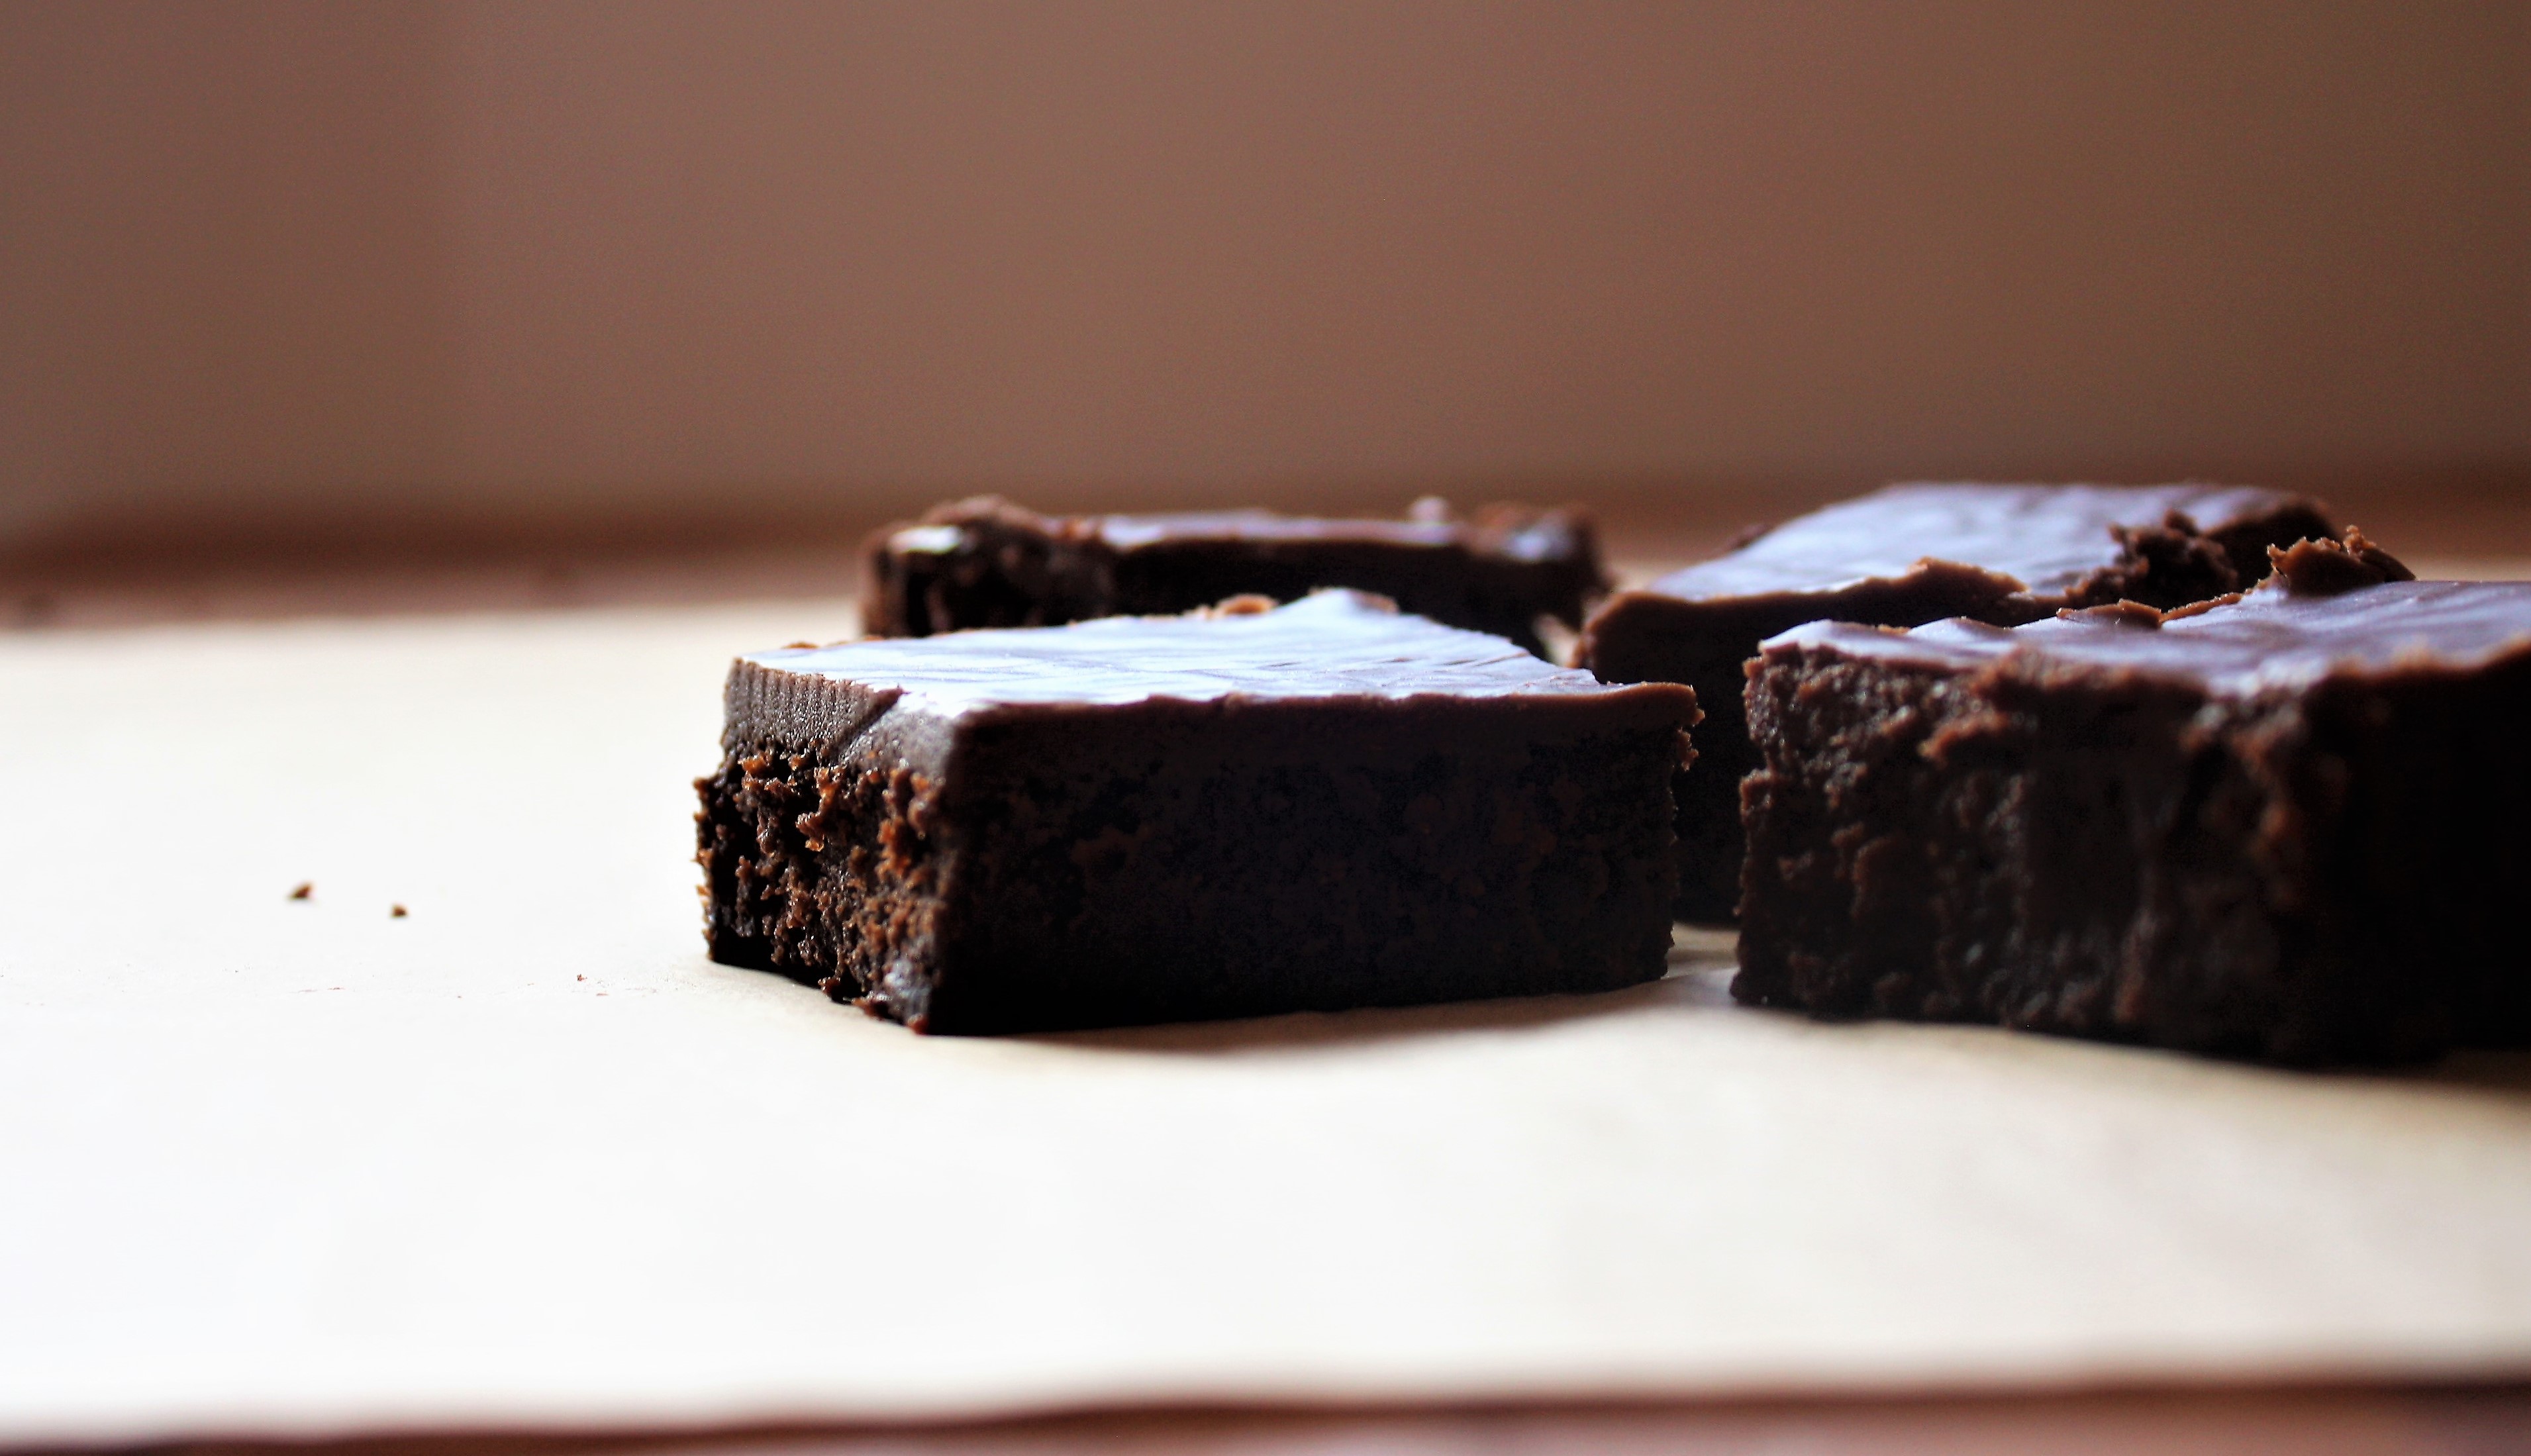
Then pour the fudge frosting onto the sheet cake. Smooth out quickly as the top of the frosting will start to set up pretty fast.  I usually wait about an hour before slicing and serving the cake, but you could serve it immediately if you don’t mind the frosting being a little soft since it will not have set up completely.

Store the frosted cake, covered, at room temperature for up to 5 days, if it lasts that long!


The Perfect Pound Cake

IMG_0287 (2)

This is the best recipe I have found for pound cake.  Truly.  It’s supposed to be a layer cake recipe, but after I made it, I knew it was destined for loaf cake greatness.  It’s buttery and dense, with a tight crumb, but moist and golden, with a soft texture.  Like I said, the perfect pound cake!

It makes 2 loaves (12″ x 4″ x 2½” or 9″ x 5″).  I like to use 2 of these pans lined with parchment.  So bake one for your family, and give one away (or store it in the freezer for another time!).

This cake uses the reverse creaming method – which basically means all the dry ingredients are mixed together first with the sugar, followed by the fat and the liquids.  I especially love that the butter is used cold, since I’m rarely patient enough to softened butter!

Buttermilk Pound Cake Adapted from Sweetapolita

2 3/4 cup cake flour

2 cups sugar

1 Tablespoon baking powder

3/4 teaspoon coarse kosher salt

1 cup cold unsalted butter, cut into chunks

1 1/2 cups buttermilk, divided

1 teaspoon vanilla

1/4 teaspoon almond extract

5 eggs

Preheat the oven to 350 degrees.  Line 2 loaf baking pans (see above for size) with a sheet of parchment (so you can use the excess parchment to lift the cakes out of the hot pans – I use half size sheets which measure 12″ x 16″) and spray with nonstick spray – set aside.

In the bowl of a stand mixer, add the flour, sugar, baking powder, and salt.  Using the paddle attachment, beat until the ingredients are combined.  If you have a mixer pouring shield, place that on top of your mixer for the next step, if not, you may want to wrap a clean dishtowel around the top to prevent flour flying everywhere.  With the mixer on low, add in the chunks of butter one at a time.  Once all the butter is added, set a timer for 3 minutes, and let the mixture continue to beat on low.

The mixture should look sandy.  In a liquid measuring cup, measure 1 cup of buttermilk, the vanilla, and the almond extract.  In another liquid measuring cup, measure the remaining 1/2 cup buttermilk, and whisk the eggs into it.

With the mixer on the lower end of medium, slowly add the buttermilk with extracts, and let it beat for 5 minutes (set a timer).  Scrape the bowl with a rubber scraper, then reduce the speed of the mixer to low, and add in the buttermilk/egg mixture in 3 parts.  Then scrape the bowl, and continue mixing batter on low for 2 minutes.

Scrape the bowl and mix a few times by hand to make sure all the dry ingredients are completely combined.  Then pour half the batter into each loaf pan.

Place the loaf pans in the oven and bake for 40-45 minutes.  Or until a toothpick inserted in the center comes out clean.  Remove the cake by lifting the parchment from the pan, to limit residual baking, and let cool on a wire rack.   Cakes are ready to serve once they’ve cooled completely.  Slice and top with fresh sweetened whip cream and berries.

Keeps for about 3-4 days covered at room temperature.

Sweetened Whip Cream Adapted from Carmella

1 cup heavy cream

6 Tablespoons sugar

In a medium mixing bowl, add heavy cream and sugar.  Beat with a hand-mixer on high speed for 1 minute to distribute the sugar.  Then let sit for about 4 minutes to allow the sugar to dissolve.  Then beat on high until soft peaks form, maybe 2-3 minutes, more if needed.  Serve immediately.  Store any leftovers in a covered container in the refrigerator for up to 3 days.  Beat again, as needed, before serving.

My Favorite Mashed Potatoes

IMG_0358 (4)

Does anyone really need another mashed potato recipe?  Maybe, maybe not!  What I do know is that these are my very favorite mashed potatoes – made with carrots, the way my grandma used to make them.  I love the extra pop of color (and the added nutrition) from the carrots, and my kids love the way they taste.

This has been one of my most requested recipes (in real life) – from family, and friends.  So if you’re in a rut with your current mashed potato recipe, give this one a try!

Mashed Potatoes Adapted from my grandmother

1 – 5 pound bag yellow/gold potatoes, peeled, washed, and cut into chunks

1/2 a bag of baby carrots

1 – 8 ounce package cream cheese

1 stick of unsalted butter

2 – 3 teaspoons coarse kosher salt (usually 2 1/2 teaspoons is perfect for me)

Freshly ground pepper, to taste (I use at least 200 grinds of fresh ground pepper)

In a large stockpot, add the potatoes and carrots – fill the pot with enough water to completely cover the potatoes and carrots.

Place on the stove, and cook on medium high heat – 5/6, until the potatoes and carrots are fork-tender. About 30 minutes, give or take.

Pour the potatoes and carrots into a colander set above a sink. Then pour the potatoes and carrots back into the hot stockpot (without their water). Return to the burner, and heat on medium high heat (5/6) mashing the potatoes and carrots (carefully, the steam can burn!) for just about 1 – 2 minutes, to get some of the extra moisture to evaporate.

Turn off the burner, and add the cream cheese and butter to the potato/carrot mixture, and mash. Continue mashing, adding the salt and pepper, to taste.  Once they’re mashed until smooth, and seasoned to taste, they’re ready to serve.

*If dinner isn’t ready, but the mashed potatoes are finished, I put a lid on the pot and they’ll hold for about 30 minutes.

Serve!  Store any leftovers in a covered container in the refrigerator for 4-5 days.

Homemade Ricotta Cheese

IMG_0214 (2)

Ricotta cheese is the best.  Unless you’ve been using the kind at the grocery store.  Ugg.  Please stop using that immediately, and give this a try!  If you don’t like it, you can go back to the store bought kind, and I won’t say a word!  To me, the store bought brands tend to be watery and grainy.  Nothing like homemade ricotta.

When I was a kid, we used to drive up to Colorado to visit my grandparents and stop at a goat farm on the way to pick up fresh goat cheese ricotta.  Which is the bees knees.  It’s so good, creamy and tangy –  and amazing slathered on a slice of toasted bread with a layer of jam on top.  It’s equally delicious mixed with herbs, cheese, and eggs to make a cheese filling for lasagna and ravioli.

After my grandmother passed away, our visits to Colorado have been fewer.  So I make my own cow’s milk ricotta (that’s amazing in it’s own right), and it’s so simple to do.  I think it has all the amazing qualities of the goat’s milk ricotta, it’s just not as tangy.

I like to serve this banana bread topped with homemade ricotta and fresh strawberries (shown above), but I never say no to toast with jam and ricotta either!  Both make for an amazing breakfast.

Homemade Ricotta Cheese Adapted from Ina Garten

4 cups whole milk

2 cups heavy cream

1 teaspoon coarse kosher salt

3 Tablespoons white wine vinegar (I like to use Prosecco vinegar)

Place a large sieve across a large bowl, and line it with cheesecloth (that has been dampened with water) – make sure to cut enough cheesecloth to hang over the bowl (it needs to be able to cover the top of the cheese in the sieve).

In a medium size stainless steel pot, add the milk, heavy cream, and salt.  Stir together, and cook on medium heat on the stove.  Continue to stir occasionally, until the milk mixture comes to a full boil.  Then pour in the white wine vinegar and stir.  Continue to boil the mixture for about 1 minute.

The milk should separate making very tiny curds.  Pour the milk mixture through the cheesecloth (set over a large bowl).  Pour out the whey mixture that collects in the bottom of your bowl, as needed (so it doesn’t overflow).  Let the cheese drain at room temperature for about 30 – 45 minutes.  Then, if you prefer a thicker ricotta, cover the top of the cheese with the overhanging cheesecloth and store the bowl (with sieve) in the refrigerator overnight to allow the cheese to continue draining.  This is how I prefer mine!  The next day, unmold the cheese and pack in a covered container to store in the refrigerator.

If you prefer a wetter, runnier cheese, feel free to spoon the cheese out of the sieve anytime after 30 – 45 minutes (once it reaches your desired consistency) and store it in a covered container in the refrigerator.

It’ll last stored this way in the refrigerator for 4-5 days.  Makes about 2 cups.  Recipe doubles easily!

Chocolate Mug Cake

IMG_0188 (2)

Drum roll, please!  For the first time ever – I made a mug cake!  Which is pretty exciting, since it’s chocolate, and gooey (like a molten lava cake, but on the outside of the cake) with spongy chocolate cake in the center.  Ice cream, not optional.  Because these babies are hot!  And they require no frosting, and microwave for about 3 minutes.  Top with any berries you have in the fridge.

So let’s talk about some essential information really quick – the mug in the photo is 16 ounces (specifically 4″ diam x 3 3/4″ h.) , and as you can see, there’s chocolate right up to the rim – because that’s how much this cake rose in the microwave before it settled back down.  So choose your mug carefully!

The recipe noted that if you choose to substitute regular cocoa powder (in place of the Dutch processed cocoa), that your cake will be lighter colored, and drier.

This recipe makes 2 servings, but I also tested it for 4 servings, so see below for the directions.**  Let’s get to it!

Chocolate Mug Cake Adapted from My First Cookbook (America’s Test Kitchen Kids) Makes 2

4 Tablespoons unsalted butter

3 Tablespoons semisweet chocolate chips

pinch of coarse kosher salt

1/3 cup sugar

2 Tablespoons Dutch processed cocoa

1 teaspoon vanilla

2 eggs

1/2 teaspoon baking powder

1/4 cup flour

You’ll need 2 (16 ounce) mugs.  Set aside.

In a medium microwave-safe bowl, add the butter, chocolate chips, and salt.  Microwave on high for about 45 seconds to 1 minute.

Whisk until completely melted, then add in the sugar, cocoa, and vanilla.  Whisk until combined.  Whisk in the eggs until completely combined.  Then whisk in the baking powder and flour until incorporated.

Pour batter equally between the mugs.  Place on opposite sides of the microwave (on the outer rim of the microwave plate) – then set the microwave to 50% power* and heat in the microwave for 1 minute, then remove mugs and stir each batter with a regular spoon (making sure to get to the bottom of each mug); return to the microwave opposite each other, and microwave on 50% power for 2 minutes.

The cake should rise above the mug during the last minute of cooking, and then go back down.  If the cake is not as set as you’d like, feel free to microwave it on 50% power for another 30 seconds.

Let the cake stand for about 5 minutes before serving.  Top with ice cream and berries!

*For my microwave, I press “Time Cook”, then enter 1:00; then hit the “Power Level” button, then the number “5” button (for 50 percent power); then “Start”.  For the second part, you’ll repeat, but change the time for “Time Cook” to 2:00.  All the other steps are the same.  My microwave defaults back to 100% power after each use.

**To make 4 servings, double the ingredients, and make according to the instructions.  Then divide the batter evenly between 4 mugs (I pour enough batter to take up about 1/3 of the 16 ounce cup).  Place mugs on the outer rim of the microwave plate with space between the mugs.  Then microwave on 50% power for 2 minutes; stirring and returning the mugs to the microwave.  Then microwave the cakes on 50% power for 3 minutes and 30 seconds.  Let cool about 5 minutes before serving.